And the winner of my 100th afghan is .....Nadine!!! Please leave a comment here, or email me at craftingfriends4you@yahoo.com with the color(s) and possible pattern you would like as soon as possible.
Thank you to everyone who entered. I will be doing another drawing in a couple of weeks for followers only, so if you already follow, you will be automatically entered. I went stir crazy waiting a whole month for people to enter this one, so from now on, I will only have it open entry for a week or 2. I know what the giveaway will be, I just need to get everything put together and take some pictures, so stay tuned :)

Enriching lives through hook & yarn
Tuesday, June 21, 2011
Wednesday, June 15, 2011
X Stitch Afghan Pattern
 |
| Blue & Yellow X Stitch Afghan Pattern |
This pattern has been updated and can be found on this blog by clicking this link
 |
| X Stitch Pattern |
How To: X Stitch
Now that we have some basic stitches down, lets learn a few stitch patterns. This first one is the X stitch. Very simple! Here are a few pictures of afghans I have made with this stitch alone.


Starting with the chain, you will DC in the 4th chain from hook
Now to make the X, you go back to the 3rd chain space and do a DC there (as shown below)
Make sure when you YO and pull your yarn through that you pull it up to the level of the other DC's.


 |
| Chain used as width of afghan |
 |
| Chain used as length of afghan |
Starting with the chain, you will DC in the 4th chain from hook
 |
| DC in 4th ch |
Then DC in the next chain (5th)
 |
| DC in 5th ch |
 |
| DC in 3rd ch |
 |
| DC in 3rd ch |
 |
| Dc in 3rd ch |
 |
| Completed X stitch |
I will be writing up the pattern this week for an afghan with this stitch that will be about 4'sq.
May 2011 Projects complete

A friend of mine puts together a box with a blanket, clothes for a hospital here in Utah. When premature babies pass away, the nurses dress them and put them in the blanket and take pictures for the family. Then everything is put in the box and given to the family for something to keep in rememberance of their baby. Such a sad experience that I hope I never have to go through. To help her with her donation, I have made a few things for her. the blankets are size 2'x2' and then premie size hats.


Tuesday, June 14, 2011
How To: Double Crochet Stitch
How To: Double Crochet Stitch
This is my favorite stitch. It adds good height, so when making an afghan, if this stitch is used the most, it seems to go faster for me. So, lets start with the chain...to give height to the edge of the DC (double crochet) you usually start your double crochet stitch in the 3rd chain from the hook.
YO, and insert hook into 3rd ch from hook.
YO, and pull through ch space. This will give you 3 loops on the hook

YO, and pull through 2 of the loops on the hook

YO once more and pull through the last 2 loops on the hook

That completes your Double Crochet Stitch. Now finish the chain to practice and even out your stitches.

How To: Single Crochet Stitch
How To: Single Crochet Stitch


Ok, so now that you have your chain, use 1 ch space as the edge to build up the side. In the 2nd ch space, we will start the single crochet stitch.

Now, yo (yarn over) and pull through the chain

Now, yo again and pull through both loops on the hook

That completes the single crochet. Now finish out the chain with single crochets to practice and you should be able to maintain even stitches.

Monday, May 30, 2011
How To: Chain
To start, make a slip knot at the start of your yarn.

YO (yarn over) - now, this is the funny part...I have been told that I do this backwards and the yarn should come from the front to the back, I do it that way for the chain, but for actual stitches, I yarn from back to front.I have never had any trouble with how I do it...so, my suggestion once again is to do it how you are comfortable.

Now, pull the yarn through the loop.

Woo Hoo!!! You just started your chain. Now, for good practice, chain a long strand just to try and get each stitch even.

This picture is the top of the chain. It's just a braid, but important to understand that this is what it looks like. There are 2 strands of yarn on top. These are considered Front Loop (frond lp) and Back Loop (back lp). Some patterns call for stitches to be made in a single strand of yarn instead of both. When this is done on an afghan, it gives it more texture to sight and touch. (I will go over this at a later time)
To be honest, I don't mind crocheting chains, but my least favorite part is the first row of anything when you have to crochet in the chain. Once I get past that, it's all a breeze.
How To's
For those of you who already know how to crochet, please bear with me for a short time while I try and zoom through the individual stitches that I will use. Once I get through those, I will be able to start showing actual stitch patterns.
How To: Read Pattern Abbreviations
There are others, but these are the main abbreviations that I use
beg ........ Beginning
CA ... .....Color A
CB ........ Color B
CC ... .....Color C
ch ... .......Chain
dc ... .......double crochet
hdc ... .....half double crochet
lp(s) ... ....loop(s)
rep ... .....repeat
sc ... ......single crochet
sl st ... ....slip stitch
tr ... ........treble crochet
yo ... ......yarn over
Wednesday, May 25, 2011
How to: Begin
My mom taught me how to crochet when I was 10 yrs old. As you can imagine, trying to hold the crochet hook the way you are supposed to was very awkward for me. The advise my mom gave me was to hold it how ever it felt comfortable. This is how I ended up holding the hook:

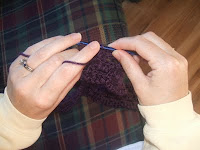
I place it so it goes over my pointer finger, under the 2 middle fingers and back over my pinky. My middle finger and thumb hold the blaket. I have found that the control with that works the best for me. So, you can wrap it around your finger, or weave it in and out...what ever makes you the most comfortable and still gives you control of the yarn. It is very important to have that tension in order to maintain even stitches throughout your project.

So - good advise! You have to feel comfortable holding the hook, or you will never finish a project. If you do, and you still aren't comfortable holding the hook, chances are, you won't crochet much more.
The second thing she taught me was to wrap the yarn around my pinky in order to give tension to the yarn to keep my stitches even. This was also very awkward for me and I really hated it. So, once again, I held it how I felt comfortable and this is it:

Subscribe to:
Posts (Atom)